Overview
The PIM API lets you send your product catalog to 3D Cloud by SKU, and the simplest integration is one automated job that runs on a schedule, at most once per night. This guide explains that job step by step, with diagrams and working code. Each call links back to the full API reference for exact parameters and responses.
Who this is for: engineers at your company who will build and maintain the product feed from your product system (ERP, PIM, or e-commerce platform).
What you will build: a scheduled job that collects your latest product data, sends it to 3D Cloud in a batch, and publishes that batch so it appears in your 3D Cloud experiences.
| You want to | Use | Reference |
|---|---|---|
| Send or update products by SKU | POST /pim/v1/products |
API reference |
| Group one upload | Batches (POST /pim/v1/batches) |
API reference |
| Publish uploaded data | Close batch with autoPromote, or PUT /pim/v1/states/auto-promote |
API reference |
| Confirm an upload arrived | GET /pim/v1/batch-data/{id} |
API reference |
This guide covers the product data (PIM) endpoints. The SIF file upload endpoints (/sif/v1/*) are listed in the reference and are not covered here.
How it works

Your job runs the five steps in order and step 3 repeats for every chunk of products. The upload goes live when step 4 closes the batch with autoPromote on.
Getting started
You need three things before your first call: a client ID, an API key, and the base URL. 3D Cloud provides the first two when your account is set up.
https://pim-api.3dcloud.io
| Item | Value | Notes |
|---|---|---|
| Base URL | https://pim-api.3dcloud.io |
Same host for every endpoint |
clientId |
Issued by 3D Cloud | Required on nearly every call |
| API key | Issued by 3D Cloud | Send with every request; store as a secret, never in source control |
The API accepts the key either in a header or as a query parameter. Use the header: query strings end up in server logs and proxies. Send the key in the x-api-key header on every request.
Run this call first to confirm your credentials work. It creates a batch, which is also the first call of every upload. A 200 returns a batch object with an id, and you are ready. A 401 means no key was sent. A 403 means the key was not recognized, or it is valid but belongs to a different client than the clientId you sent.
curl -s -X POST "https://pim-api.3dcloud.io/pim/v1/batches?clientId=$PIM_CLIENT_ID" \
  -H "x-api-key: $PIM_API_KEY"
To rehearse without touching live data, set the publishTarget parameter to any name you choose, such as sandbox-acme, on the calls that accept it. The name is arbitrary and does not have to be latest, staging or active. Do not combine a custom target with autoPromote=true: autoPromote publishes to the real staging and active targets whatever the target is. By default data goes to the latest target.
Product data model
Every product you send needs an id and a sku; everything else is optional, so you can start small and add fields over time. You send products as a JSON array to POST /pim/v1/products. Sending a product that already exists updates it. The complete schema is in the API reference.
Two rules to remember: id is the primary key and should be unique across your catalog. sku is case-sensitive, so ABC-100 and abc-100 are different products.
| Group | Fields | Notes |
|---|---|---|
| Identity (required) | id, sku |
id is the primary key |
| Descriptive | name, description, dimensions, brand, family, skuType |
skuType examples: SKU, Installation SKU, Non-Selling |
| Manufacturer | mfgSku, mfgName |
mfgSku is case-sensitive |
| Look and finish | finish, color |
Free text |
| Pricing | defaultPrice, defaultCurrency, discount, promo |
defaultCurrency is ISO 4217 (USD, EUR); discount and promo accept a price, percentage or text |
| Categories | categories, categoryTree |
categoryTree is a list of paths, each one string of names from parent to child joined by your client's delimiter; order matters |
| Links and media | pdpURL, imageURLs |
Product page and image links |
| Custom attributes | defAtrName1 to defAtrName6, defAtrVal1 to defAtrVal6 |
Up to six name/value pairs of your choice |
| Structure | productGroups, regions |
Nested objects; see the reference for their shape |
A minimal product and a fuller one:
[
  {
    "id": "10045",
    "sku": "SOFA-3S-GRY"
  },
  {
    "id": "10046",
    "sku": "SOFA-3S-NVY",
    "name": "Hudson 3-Seat Sofa",
    "brand": "Hudson",
    "color": "Navy",
    "defaultPrice": 1299.00,
    "defaultCurrency": "USD",
    "categoryTree": ["Furniture > Living Room > Sofas"],
    "imageURLs": ["https://example.com/images/sofa-3s-nvy.jpg"],
    "pdpURL": "https://example.com/p/sofa-3s-nvy"
  }
]
Using PIM data with Design With Me AI
Design With Me (DWM) AI works from the same SKU-keyed catalog you upload here, so complete product data gives you better recommendations, search and generated room images. One upload also feeds the 3D Cloud Asset Management System (AMS), which links your products to their 3D model metadata for apps such as the Room Planner.

You upload once; the same published data serves the 3D model apps and Design With Me AI.
How DWM uses your products
The DWM SDK documentation describes three places where your catalog shows up:
- Recommendations.
forProductstakes a list of your SKUs and returns similar, complementary, decor or price-alternative products. Results contain only askuand ascore, so your own site or app looks up the name, price and images for each SKU. Your SKUs in the PIM must therefore match the SKUs in your storefront. - Search.
searchtakes free text plus optional filters forcolor,brand,manufacturer,finish,familyandstyle. There is no category filter, so apps put the category in the query text. - Image generation. A catalog product is referenced by its ID, with an optional
name. The SDK documentation says including the name improves the quality of the generated scene.
Which products DWM can see is an account setting that 3D Cloud configures, not something the upload controls. To change the set, contact your 3D Cloud representative.
Known limitation for sandbox targets. The PIM backend accepts any publishTarget name, but the Design With Me front end cannot yet be pointed at a custom publish target. Data you upload to a sandbox target cannot be previewed in Design With Me for now.
Required fields for DWM
The PIM API itself marks only id and sku as required. For DWM, send all five of the fields below on every product.
| DWM needs | PIM field | What to send |
|---|---|---|
| SKU | sku |
The exact, case-sensitive SKU from your storefront. DWM returns SKUs, and your app must be able to look each one up. |
| Name | name |
The customer-facing product name, as a shopper would recognize it. |
| Images | imageURLs |
One or more full URLs to product images that load without signing in. Images must be at least 1000 x 1000 pixels (1K on each side); larger is fine. |
| Dimensions | dimensions |
Text as width x depth x height with no unit labels, for example 84x36x33. |
| Category | categoryTree (or categories) |
Each path is one string, parent to child, joined by your client's delimiter (3D Cloud sets it for your account), such as "Furniture > Living Room > Sofas". Use plain words a shopper would search for. |
These fields help DWM's search filters most when they are filled in:
| DWM search filter | PIM field |
|---|---|
color |
color |
brand |
brand |
finish |
finish |
family |
family |
DWM also offers manufacturer and style filters; ask your 3D Cloud representative which PIM fields feed them.
A DWM-ready product (dimensions are width x depth x height in one unit for the whole catalog, such as inches):
{
  "id": "10046",
  "sku": "SOFA-3S-NVY",
  "name": "Hudson 3-Seat Sofa",
  "imageURLs": ["https://example.com/images/sofa-3s-nvy.jpg"],
  "dimensions": "84x36x33",
  "categoryTree": ["Furniture > Living Room > Sofas"],
  "color": "Navy",
  "brand": "Hudson",
  "finish": "Performance velvet",
  "family": "Hudson"
}
Because the API will not enforce the four fields beyond sku, check them in your upload job before you upload. This helper works with the Python example in the code examples section; hold back or fix the products it flags.
def missing_dwm_fields(product):
    """Return the DWM-required fields this product is missing."""
    checks = {
        "id": product.get("id"),
        "sku": product.get("sku"),
        "name": product.get("name"),
        "imageURLs": product.get("imageURLs"),
        "dimensions": product.get("dimensions"),
        "category": product.get("categoryTree") or product.get("categories"),
    }
    return [field for field, value in checks.items() if not value]


ready = [p for p in products if not missing_dwm_fields(p)]
flagged = {p["sku"]: missing_dwm_fields(p) for p in products if missing_dwm_fields(p)}
if flagged:
    log.warning("%s products are missing DWM fields: %s", len(flagged), flagged)
The upload pattern
Each upload is one batch: create it, fill it with products, close it, and publish it. Grouping an upload in a batch means its changes reach staging and active together, when you promote the batch. Upload as often as your data changes, but no more than once a night. The five steps below are the recommended flow; the diagram under How it works shows them end to end.
- Extract. Pull the products that were added or changed since the last run from your source system, and map them to the product fields. Products you do not send keep their current data, so you never need to resend unchanged products; sending the full catalog each upload also works.
- Create a batch.
POST /pim/v1/batcheswith yourclientId. You do not need to name the batch: the API gives it a date/time name and returns it as the batchid. Use thatidas thebatchNameon the next calls. - Upload products in chunks.
POST /pim/v1/productswith theclientId, thebatchName, and a JSON array of products. There is no hard limit on request size; we recommend 500 products per request. By default the batch closes automatically after a save (autoCloseBatch=true), so sendautoCloseBatch=falseon every chunk when you upload more than one. - Close and publish.
POST /pim/v1/batches/closewithautoPromote=true. This closes the batch and publishes it to the staging and active targets in one step. Use it for production runs only, because it ignorespublishTarget(see Rehearsing with a publish target below). - Verify.
GET /pim/v1/batch-data/{id}returns a download link for the data in that batch, using the batchidfrom step 2. Download it to confirm the products you uploaded arrived, and alert your team if they did not.
Batches add to what is already live. A promoted batch is applied on top of the data that is already live, so products you leave out are unchanged. This also means leaving a product out never removes it, and the PIM API has no delete call.
Removing discontinued products. To retire a SKU, send it in your normal upload with availability set to -1 in each entry of its regions array. Send one entry for every store or region where the SKU was sold. Each entry holds id, region, locale, price, currency and availability. The optional startDatetime and endDatetime fields (ISO 8601 UTC) apply to pricing changes and are not needed for discontinued products.
The availability value works as follows:
-1: discontinued.0: available now (quick availability). This is the default.1or more: the number of days until the product is available (out of stock).
{
  "id": "10046",
  "sku": "SOFA-3S-NVY",
  "regions": [
    {
      "id": "STORE-0009",
      "region": "STORE-0009",
      "locale": "en_US",
      "price": 72.98,
      "currency": "USD",
      "availability": -1
    }
  ]
}
Re-running safely. Products are saved by id and sku, so sending the same product twice updates it rather than duplicating it. A retry after a failure can reuse the failed run's batch id or start a new batch; both are safe. If a batch was already closed and you need to add more, reopen it with POST /pim/v1/batches/open.
Scheduling. Run the job at most once per night, after your source system finishes its own overnight processing, and keep a log of each run's batch id, product count and result. The code examples below include a cron example.
Hold back for review. To check a batch before it goes live, leave autoPromote off at step 4, download the batch with GET /pim/v1/batch-data/{id} to inspect it, and promote it later with PUT /pim/v1/states/auto-promote once you are satisfied.
Rehearsing with a publish target. autoPromote=true publishes to the real staging and active targets whatever publishTarget says, so a rehearsal that uses it would go live. To rehearse, set publishTarget on the save and close calls and leave autoPromote off. Verify with GET /pim/v1/batch-data/{id} as usual. Both example scripts do this when PIM_PUBLISH_TARGET is set.
Code examples: a scheduled upload job
The scripts below implement the five-step flow and have been run end to end against a mock of the API; run them against a sandbox publishTarget before you point them at live data, by setting PIM_PUBLISH_TARGET (leave it unset in production). Replace fetch_changed_products with a query against your own system. Both scripts read PIM_CLIENT_ID and PIM_API_KEY from the environment, retry network errors, 429 and 5xx responses with backoff, and exit non-zero on failure so your scheduler can alert.
The calls with curl
Useful for a first manual test. Each call matches a step in the flow.
BASE=https://pim-api.3dcloud.io

# 1. Create the batch (no name needed) and keep the id it returns
BATCH=$(curl -s -X POST "$BASE/pim/v1/batches?clientId=$PIM_CLIENT_ID" \
  -H "x-api-key: $PIM_API_KEY" | jq -r .id)

# 2. Upload products (repeat per chunk)
curl -X POST "$BASE/pim/v1/products?clientId=$PIM_CLIENT_ID&batchName=$BATCH&autoCloseBatch=false" \
  -H "x-api-key: $PIM_API_KEY" -H "Content-Type: application/json" \
  -d '[{"id":"10045","sku":"SOFA-3S-GRY","name":"Hudson 3-Seat Sofa"}]'

# 3. Close the batch and publish
curl -X POST "$BASE/pim/v1/batches/close?clientId=$PIM_CLIENT_ID&batchName=$BATCH&autoPromote=true" \
  -H "x-api-key: $PIM_API_KEY"

# 4. Verify: get a download link for the batch's data
curl "$BASE/pim/v1/batch-data/$BATCH" -H "x-api-key: $PIM_API_KEY"
Python (requests)
#!/usr/bin/env python3
"""Scheduled product upload to the 3D Cloud PIM API (run at most once per night)."""
import logging
import os
import sys
import time

import requests

BASE_URL = os.environ.get("PIM_BASE_URL", "https://pim-api.3dcloud.io")
CLIENT_ID = os.environ["PIM_CLIENT_ID"]
API_KEY = os.environ["PIM_API_KEY"]
# Set for rehearsals (any name you choose). Leave unset in production.
PUBLISH_TARGET = os.environ.get("PIM_PUBLISH_TARGET")
CHUNK_SIZE = 500          # products per request (recommended)
MAX_ATTEMPTS = 5

logging.basicConfig(level=logging.INFO, format="%(asctime)s %(levelname)s %(message)s")
log = logging.getLogger("pim-upload")
session = requests.Session()
session.headers["x-api-key"] = API_KEY


def call(method, path, **kwargs):
    """Send a request; retry network errors, 429 and 5xx with backoff."""
    for attempt in range(1, MAX_ATTEMPTS + 1):
        try:
            resp = session.request(method, BASE_URL + path, timeout=60, **kwargs)
            if resp.status_code != 429 and resp.status_code < 500:
                return resp
            problem = f"HTTP {resp.status_code}"
        except requests.RequestException as exc:
            problem = str(exc)
        if attempt == MAX_ATTEMPTS:
            raise RuntimeError(f"{method} {path} failed after {attempt} attempts: {problem}")
        wait = min(2 ** attempt, 60)
        log.warning("%s %s: %s; retrying in %ss", method, path, problem, wait)
        time.sleep(wait)


def fetch_changed_products():
    """Replace with a query against your own product system."""
    return [
        {"id": "10045", "sku": "SOFA-3S-GRY", "name": "Hudson 3-Seat Sofa",
         "defaultPrice": 1299.00, "defaultCurrency": "USD"},
    ]


def chunks(items, size):
    for i in range(0, len(items), size):
        yield items[i:i + size]


def save_chunk(batch_name, products):
    params = {"clientId": CLIENT_ID, "batchName": batch_name, "autoCloseBatch": "false"}
    if PUBLISH_TARGET:
        params["publishTarget"] = PUBLISH_TARGET
    resp = call("POST", "/pim/v1/products", params=params, json=products)
    if resp.status_code == 400:  # often "batch is closed" (for example, a re-run)
        log.warning("Save returned 400 (%s); reopening batch %s once", resp.text, batch_name)
        call("POST", "/pim/v1/batches/open",
             params={"clientId": CLIENT_ID, "batchName": batch_name}).raise_for_status()
        resp = call("POST", "/pim/v1/products", params=params, json=products)
    if not resp.ok:
        raise RuntimeError(f"Save products failed: HTTP {resp.status_code} {resp.text}")


def main():
    products = fetch_changed_products()
    if not products:
        log.info("Nothing to upload")
        return 0

    # 1. Create a batch. No name needed: the API names it and returns it as "id".
    resp = call("POST", "/pim/v1/batches", params={"clientId": CLIENT_ID})
    resp.raise_for_status()
    batch_name = resp.json()["id"]
    log.info("Created batch %s", batch_name)

    # 2. Upload products in chunks
    for n, chunk in enumerate(chunks(products, CHUNK_SIZE), start=1):
        save_chunk(batch_name, chunk)
        log.info("Uploaded chunk %s (%s products)", n, len(chunk))

    # 3. Close the batch. autoPromote publishes to the REAL staging and active
    #    whatever publishTarget says, so it is only set when no rehearsal target is used.
    params = {"clientId": CLIENT_ID, "batchName": batch_name}
    if PUBLISH_TARGET:
        params["publishTarget"] = PUBLISH_TARGET
    else:
        params["autoPromote"] = "true"
    resp = call("POST", "/pim/v1/batches/close", params=params)
    resp.raise_for_status()
    warnings = 0
    if resp.status_code == 202:  # accepted, but part of the request could not be handled
        warnings += 1
        log.warning("Close returned 202: part of the request could not be handled (%s)", resp.text)

    # 4. Verify: ask for a download link to the batch's data, then check the contents.
    check = call("GET", f"/pim/v1/batch-data/{batch_name}")
    check.raise_for_status()
    log.info("Batch data is available for download: %s", check.text)
    log.info("Uploaded %s products in batch %s", len(products), batch_name)
    return 2 if warnings else 0  # exit code 2 = finished, but check the batch


if __name__ == "__main__":
    try:
        sys.exit(main())
    except Exception:
        log.exception("Upload failed")
        sys.exit(1)
Node.js (version 18 or later, no dependencies)
// Scheduled product upload to the 3D Cloud PIM API (Node 18+; run at most once per night).
const BASE_URL = process.env.PIM_BASE_URL ?? "https://pim-api.3dcloud.io";
const CLIENT_ID = process.env.PIM_CLIENT_ID;
const API_KEY = process.env.PIM_API_KEY;
// Set for rehearsals (any name you choose). Leave unset in production.
const PUBLISH_TARGET = process.env.PIM_PUBLISH_TARGET;
const CHUNK_SIZE = 500; // products per request (recommended)
const MAX_ATTEMPTS = 5;

const sleep = (ms) => new Promise((resolve) => setTimeout(resolve, ms));

// Send a request; retry network errors, 429 and 5xx with backoff.
async function call(method, path, params = {}, body) {
  const url = `${BASE_URL}${path}?${new URLSearchParams(params)}`;
  for (let attempt = 1; attempt <= MAX_ATTEMPTS; attempt++) {
    let problem;
    try {
      const res = await fetch(url, {
        method,
        headers: { "x-api-key": API_KEY, "Content-Type": "application/json" },
        body: body ? JSON.stringify(body) : undefined,
        signal: AbortSignal.timeout(60_000),
      });
      if (res.status !== 429 && res.status < 500) return res;
      problem = `HTTP ${res.status}`;
    } catch (err) {
      problem = String(err);
    }
    if (attempt === MAX_ATTEMPTS) throw new Error(`${method} ${path} failed: ${problem}`);
    const wait = Math.min(2 ** attempt, 60);
    console.warn(`${method} ${path}: ${problem}; retrying in ${wait}s`);
    await sleep(wait * 1000);
  }
}

async function ok(res, what) {
  if (!res.ok) throw new Error(`${what} failed: HTTP ${res.status} ${await res.text()}`);
  return res;
}

// Replace with a query against your own product system.
async function fetchChangedProducts() {
  return [{ id: "10045", sku: "SOFA-3S-GRY", name: "Hudson 3-Seat Sofa",
            defaultPrice: 1299.0, defaultCurrency: "USD" }];
}

async function saveChunk(batchName, products) {
  const params = { clientId: CLIENT_ID, batchName, autoCloseBatch: "false" };
  if (PUBLISH_TARGET) params.publishTarget = PUBLISH_TARGET;
  let res = await call("POST", "/pim/v1/products", params, products);
  if (res.status === 400) { // often "batch is closed" (for example, a re-run)
    console.warn(`Save returned 400 (${await res.clone().text()}); reopening batch once`);
    await ok(await call("POST", "/pim/v1/batches/open", { clientId: CLIENT_ID, batchName }), "Reopen batch");
    res = await call("POST", "/pim/v1/products", params, products);
  }
  await ok(res, "Save products");
}

async function main() {
  const products = await fetchChangedProducts();
  if (products.length === 0) return console.log("Nothing to upload");

  // 1. Create a batch. No name needed: the API names it and returns it as "id".
  const created = await ok(await call("POST", "/pim/v1/batches", { clientId: CLIENT_ID }), "Create batch");
  const batchName = (await created.json()).id;
  console.log(`Created batch ${batchName}`);

  // 2. Upload products in chunks
  for (let i = 0; i < products.length; i += CHUNK_SIZE) {
    await saveChunk(batchName, products.slice(i, i + CHUNK_SIZE));
    console.log(`Uploaded ${Math.min(i + CHUNK_SIZE, products.length)} of ${products.length}`);
  }

  // 3. Close the batch. autoPromote publishes to the REAL staging and active
  //    whatever publishTarget says, so it is only set when no rehearsal target is used.
  const closeParams = { clientId: CLIENT_ID, batchName };
  if (PUBLISH_TARGET) closeParams.publishTarget = PUBLISH_TARGET;
  else closeParams.autoPromote = "true";
  const closed = await ok(await call("POST", "/pim/v1/batches/close", closeParams), "Close batch");
  if (closed.status === 202) { // accepted, but part of the request could not be handled
    console.warn("Close returned 202: part of the request could not be handled", await closed.text());
    process.exitCode = 2; // finished, but check the batch
  }

  // 4. Verify: ask for a download link to the batch's data, then check the contents.
  const check = await ok(await call("GET", `/pim/v1/batch-data/${batchName}`), "Get batch data");
  console.log("Batch data is available for download:", await check.text());
}

main().catch((err) => { console.error(err); process.exit(1); });
Scheduling it
On Linux, one crontab line runs the Python job at 2:30 AM server time and appends its log:
30 2 * * * PIM_CLIENT_ID=your-client-id PIM_API_KEY=your-key /usr/bin/python3 /opt/pim/nightly_upload.py >> /var/log/pim_upload.log 2>&1
In production, load the key from your secrets manager rather than writing it into the crontab. Cloud schedulers (AWS EventBridge, Azure Functions timers, Google Cloud Scheduler, GitHub Actions) work the same way.
Error handling and retries
Retry only failures that can fix themselves (network errors, 429, 5xx), and stop and alert on the rest. The API reports these status codes; the reference does not define an error body, so log the status code and the response text.
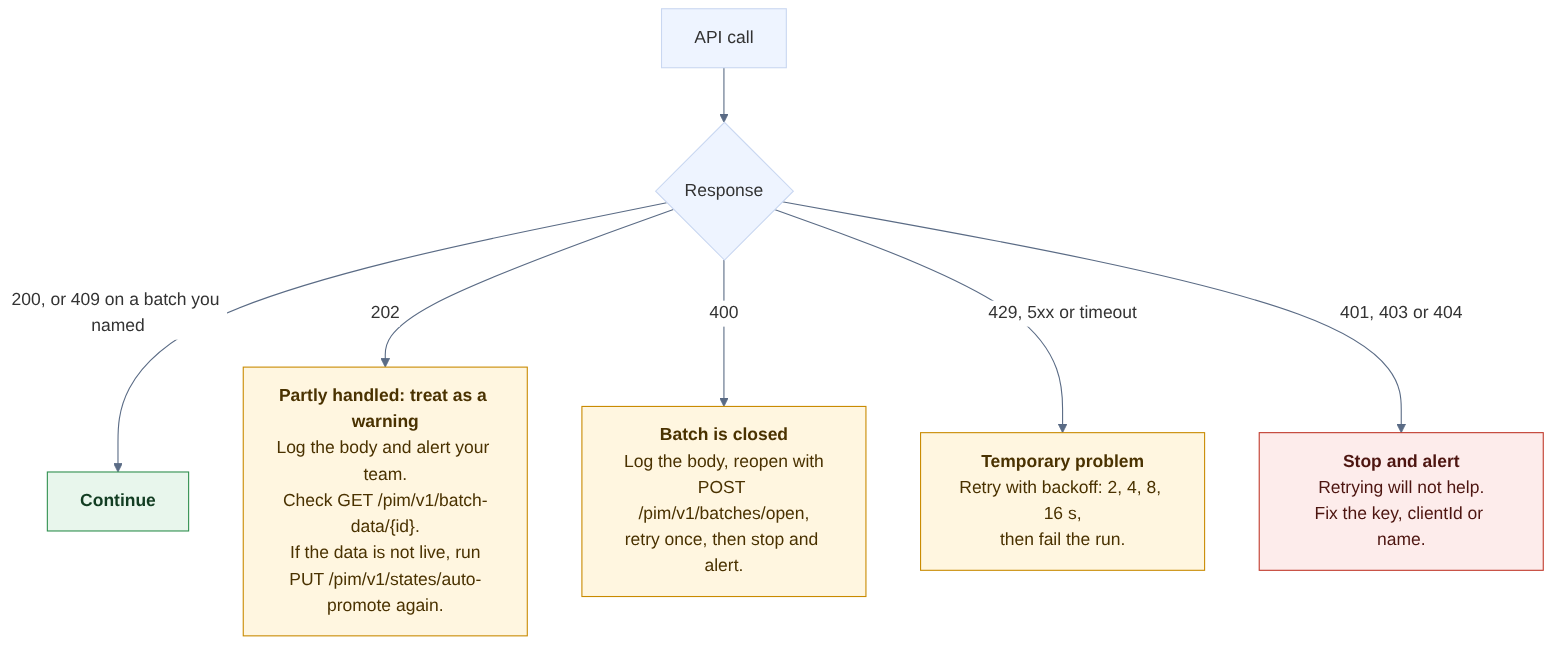
The table below gives the detail for each code.
| Code | Meaning | What your job should do |
|---|---|---|
200 |
Success | Continue |
202 |
Accepted by the server, but part of the request could not be handled (close batch, auto-promote) | Treat as a warning: log the response and alert your team, confirm the data with GET /pim/v1/batch-data/{id}, and run PUT /pim/v1/states/auto-promote again for the batch if your data is not live |
400 |
The reference lists this for a closed batch | Log the response body in case it reports something else, reopen the batch with POST /pim/v1/batches/open, then retry once; if it fails again, stop and alert |
401 |
No API key was sent | Stop and alert; fix the request |
403 |
The key was not recognized, or it is valid but belongs to a different client than the clientId |
Stop and alert; retrying will not help |
404 |
Batch, state or publish target not found | Check the name you sent; stop and alert |
409 |
Batch already exists (only when you pass your own batchName) | Carry on with the existing batch, or create a new one without a name |
429, 5xx, timeouts |
Temporary problem | Retry with exponential backoff (2, 4, 8, 16 seconds), then fail the run |
The example scripts already follow this table. Because saves are keyed by id and sku, the safest recovery from any failed run is to run the job again.
Monitoring and go-live checklist
A scheduled job is only reliable if someone is told when it fails, so wire up alerts before you go live. Two endpoints help you see what happened: GET /pim/v1/batch-data/{id} returns a download link for the data in one batch, which is the way to confirm an upload arrived, and GET /pim/v1/batches lists your batches and whether each is closed. Both are in the API reference.
Work through this list before the first production run:
- [ ] Credentials work: creating a batch returns
200for yourclientId - [ ] The API key is stored in a secrets manager, not in code or the crontab
- [ ] Every product has a unique
idand askuwith the exact casing used in your other systems, plus a name, images, dimensions and a category if you use Design With Me AI - [ ] A full run succeeds against a sandbox
publishTarget - [ ] A second run on the same day succeeds
- [ ] The job exits non-zero on failure and your scheduler or monitor sends an alert
- [ ] A
202response from close batch raises a warning and your job checks the batch - [ ] Each run logs batch id, product count, duration and result
- [ ] Someone owns the job and knows where its logs are
Quick reference
These are the endpoints this guide uses, plus the ones you may want later. Parameters, schemas and sample responses for each are in the detailed API reference. clientId is required on nearly every call.
| Task | Method and path | Key parameters |
|---|---|---|
| Create a batch | POST /pim/v1/batches |
clientId, batchName (optional; the API names the batch if you leave it out) |
| List batches | GET /pim/v1/batches |
clientId, pageSize (default 25) |
| Save or update products | POST /pim/v1/products |
clientId, batchName, autoCloseBatch (default true), autoPromote (default false), publishTarget (default latest); body is an array of products |
| Close a batch | POST /pim/v1/batches/close |
clientId, batchName, autoPromote, publishTarget; autoPromote publishes to staging and active whatever publishTarget says |
| Reopen a batch | POST /pim/v1/batches/open |
clientId, batchName |
| Promote a batch to staging and active | PUT /pim/v1/states/auto-promote |
clientId, batchName |
| See promotion history | GET /pim/v1/state-history |
clientId, pageSize, createdTimeCursor |
| Download a batch's product data | GET /pim/v1/batch-data/{id} |
id is the batch id; returns a download link |
| Download a publish target's product data | GET /pim/v1/publish-target-data/{id} |
id is the publish target name; returns a download link |
| Copy one publish target to another | POST /pim/v1/publish-target/sync |
clientId, source, target, replace |
The older DELETE /pim/v1/batches call still exists but is deprecated; use POST /pim/v1/batches/close instead. For SIF file uploads (/sif/v1/*), files over 32 MB need a signed upload URL first; see the reference.
Links, written out in full for printed copies:
- API reference: https://pim-api.3dcloud.io/documentation
- Design With Me SDK documentation: https://developers.3dcloud.com/designwithme-ai/docs/1-0-0-designwithme-sdk
Questions about your account, keys or publish targets: contact your 3D Cloud representative.